|
INTRODUCTION
Reading dimensions is a basic necessity in project creation (e.g. building a miniature vehicle or enclosure). Though it may seem tedious, getting it right would save you the hassle of having to go back and forth to the drawing board. In this section, terminology, basic concepts as well as some tips to get you started are shared.
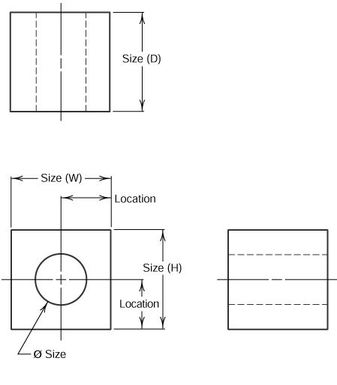
TERMINOLOGYDimension | The numerical value used to describe the size and geometric characteristic of a feature.
Basic Dimension | The theoretical numerical value of the feature. Reference Dimension | The numerical value enclosed in parentheses provided for information only and is rarely referred to for fabrication. Dimension and Extension Lines | The thin solid lines which shows the extent and direction of a dimension as well as which feature is associated with the dimension. Tolerance | The amount a particular dimension is expected to vary. (Take note of this when drilling of holes.) Plus and minus dimensioning | The allowable positive and negative variance from the dimension specified. Basic conceptsDimensions are used to describe the size and location of features in a desired part. The basic question to ask one's self is "What do I need to know to make/incorporate this object?". Dimensions should not be excessive whereby duplication of dimensioning occurs.
TIPSWhen it comes to dimensions, these are the few important questions to ask yourself. Once it becomes a habit, you will save yourself the trouble of going back and forth 3D drawings or even wastage of materials.
1. What is the measuring system used?
Typically, drawings of components (e.g. Arduino UNO board) used in the United States (US) would use dimensions in inches. However, most countries outside of the US refer to the metric system. Noting that 1 inch is equivalent to 2.54cm, this could result in an incorrect scaling, hence do pay attention to this simple factor. 2. Want to incorporate a component? Here is a quick tip. Given a diagram as shown below: 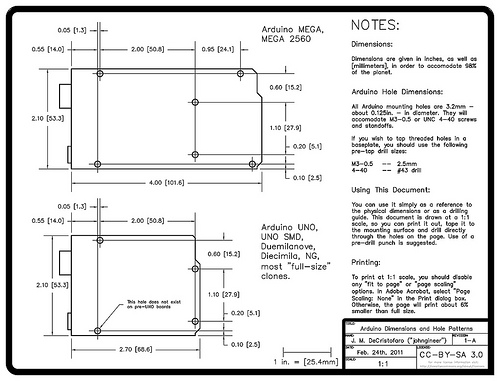
(image from: https://blog.adafruit.com/2011/02/28/arduino-hole-dimensions-drawing/)
3. Take note of symbols used.
For example the diameter sign, ∅ and radius symbol, R. USEFUL LINKSThe links below were referenced in creating the summary above, do refer to them for further details.
|